


AiM Single RearMaster mirror camera patch cable
Description
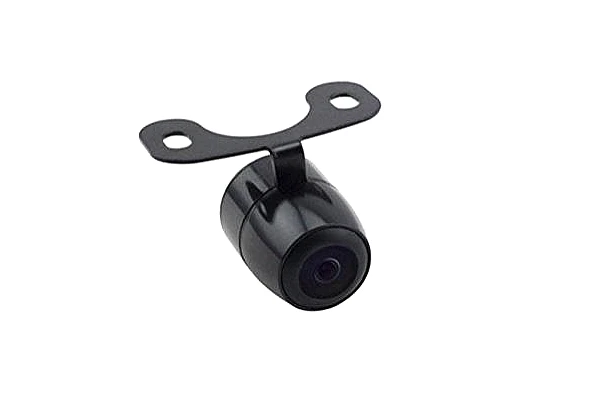
RearMaster Reversing/Rear View Mirror Camera to fit all Aim MX Displays and Data Loggers. Extremely useful for road car builds and race car Pit reversing.
Physical Connection
The Aim loggers built to manage rear cameras are provided with a female metallic 5 pins Binder connector, placed on the device bottom and labelled as “VIDEO IN” (following image).


The Video In connector allows the connection of two different analogue cameras, that may be activated as here down described.
- This camera offers a couple of interesting options:he possibility to reverse the image
- The possibility to enable or disable the parking overlay view
Please Note: some analogue cameras require a 3.3V power. Please, verify before you connect yours to the +Vb output (12V), supplied by the pin3 of the Binder connector .
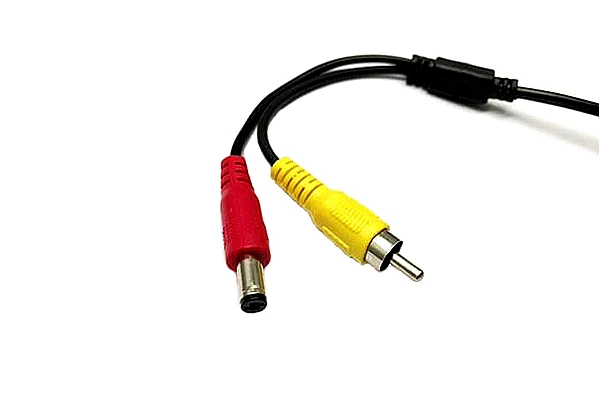
It has, as most of the analogue cameras, a connection through standard RCA connectors (following right image), for which we have developed the patch cables:

Single RearMaster camera (cable length: 5m) ended with:
- Male metallic 5 pins Binder connector for connection to Aim loggers
- DC Power Connector (yellow) to be connected to the camera one;
- Video RCA Connector (red) to be connected to the camera one.

Double RearMaster camera (cable length: 6m) ended with
- Male metallic 5 pins Binder connector for connection to AiM loggers
- X2 DC Power Connector (yellow)* to be connected to the camera one
- X2 Video RCA Connector (red)* to be connected to the camera one.
* The two DC Power and Video RCA cables couples are respectively 4m and 6m long, in order to allow both front camera and rear camera connection
Aim offers the same camera with a more reliable Binder connection (Part no. XB1ZCAMHD00; Binder conector pinouts are specified below):


The patch cables available are:
Single Aim Mirror Camera (6m length) ended with- Male metallic 5 pins Binder connector for connection to AiM loggers
- Female metallic 5 pins Binder connector for Mirror Camera connection.

Double Aim Mirror Camera: ended with:
- Male metallic 5 pins Binder connector for connection to AiM loggers
- X2 female metallic Binder connectors: each one must be used to connect the Mirror Camera (cable lengths 4m – front camera – and 6m – rear camera).

Configuration through Race Studio 3
Once the connection has been executed, it is necessary to configure the device, defining a specific event that causes the camera image displaying. For example, if you wish to turn ON the camera when you insert the Reverse Gear, these are the steps to follow:
- Open Race Studio 3, connect your system via Wi-Fi or USB and create a new configuration (or modify an existing one).
- The Gear, of course, is supposed to be one of the available channels. It is possible to obtain it
Through the analogue sensor, plugging it into one of the device analogue channels, which must be configured as expressed on the right (Channels tab). The “Use reverse gear” box must be ticked.

Through ECU, selecting the compatible protocol with your vehicle ECU from the ECU Stream tab.

Open the Trigger Commands tab and click “Add New Command”: select “First Camera Input Page” as a command to activate when the Gear is equal to “R”.

Settings through Aim device menu
The camera parameters setting must be executed from the device menu directly, as explained below:
- Press “MENU/<<” button.
- Pressing “PREV and “NEXT”, move on the VIDEO IN icon and press “ENTER”.
- The system offers the possibility to set the image format (PAL or NTSC – according to the camera technical specs), brightness and contrast for each available input.

If no key is pressed, after 5 seconds the menu disappears, showing the camera image in live streaming, so that it can be better positioned.

Downloads
Information Sheet
Details
- V02573390
- V02573390
- AiM Sports
- Aim Supply has been severely affected due to material shortages and most products are currently on a 3 month delivery date. Please send us an email request to find out ETAs.
- New
Categories
Shipping Information
- Item Requires Shipping
- 0.5 lbs.
- W6.0000” x H4.0000” x L1.5000”
Customer Reviews
 Total Reviews (0)
You must login to post a review.
Write the First Review!